2. Raw Touch with Mouse Events
In addition to indicating a
"click" or touch even, mouse events can be used for raw touch. An
example of raw touch is drawing with your finger, where you need
individual touch locations. What enables raw touch with mouse events is
the MouseEventArgs class passed into the mouse events. The following are the key properties of the MouseEventArgs class:
GetPosition(UIElement relativeTo): Gets the position of the mouse event in relation to the passed in object. Returns a Point object.
OriginalSource: Provides a reference to the object that raised the event.
StylusDevice: Returns a StylusDevice object that includes the set of stylus points associated with the input.
The StylusDevice object contains a GetStylusPoints method that returns a StylusPointsCollection that we can draw an object onscreen to represent user touches. The StylusPoint class is enhanced over the Point class with the StylusPoint. PressureFactor property. Because PressureFactor is a float, we can assign it to the Opacity
property of the object we draw onscreen to represent touches such that
the Opacity indicates whether it is a light or heavy press on the
screen. So a light pressure press will have a lower opacity when drawn
on screen.
In the next couple of sections
we will build a mini finger drawing application that includes
multi-color selection, ListBox customizations, animations, the
application bar, and basic drawing functionality.
2.1. Setting Up the Basic UI
Add a Windows Phone Portrait Page new item to the SinglePointTouch project. Uncomment the sample ApplicationBar
code at the bottom of the page. We will use the ApplicationBar to
implement commands to clear the drawing canvas, set the touch object
size, and so on.
At the top we set the title and subtitle for the page. In the default ContentPanelGrid object, we add a Canvas object. On top of the Canvas object is a RectangleCanvas object to place the objects that represent user touches using X that receives the mouse events. We take advantage of absolute positioning in the and Y coordinates provided by StylusPoint objects. The following is a XAML snippet of the TitlePanel and ContentPanel:
<!--TitlePanel contains the name of the application and page title-->
<StackPanel x:Name="TitlePanel" Grid.Row="0" Margin="12,17,0,28">
  <TextBlock x:Name="ApplicationTitle" Text="Chapter 3 - SinglePointTouch"
              Style="{StaticResource PhoneTextNormalStyle}"/>
  <TextBlock x:Name="PageTitle" Text="finger painting" Margin="9,-7,0,0"
              Style="{StaticResource PhoneTextTitle1Style}"/>
</StackPanel>

<!--ContentPanel - place additional content here-->
<Grid x:Name="ContentPanel" Grid.Row="1" Margin="24,0,0,0">
  <Canvas x:Name="DrawCanvas"  >
    <Rectangle Fill="White"  Stroke="Black"
        MouseMove="Rectangle_MouseMove" Width="456" Height="535"  />
  </Canvas>
</Grid>
The following is the Rectangle_MouseMove event handler on the Rectangle object and related helper method:
private void Rectangle_MouseMove(object sender, MouseEventArgs e)
{
  foreach (StylusPoint p in e.StylusDevice.GetStylusPoints(DrawCanvas))
  {
    Ellipse ellipse = new Ellipse();
    ellipse.SetValue(Canvas.LeftProperty, p.X);
    ellipse.SetValue(Canvas.TopProperty, p.Y);
    ellipse.Opacity = p.PressureFactor;
    ellipse.Width = 20d;
    ellipse.Height = 20d;
    ellipse.IsHitTestVisible = false;
    ellipse.Stroke = new SolidColorBrush(Colors.Black);
    ellipse.Fill = new SolidColorBrush(Colors.Black);
    DrawCanvas.Children.Add(ellipse);
  }
}
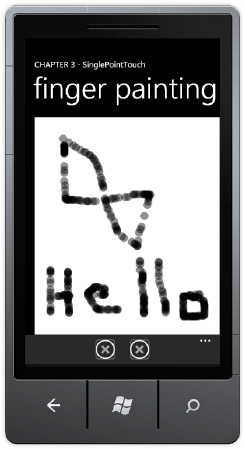
The application uses the MouseMove event and the StylusPointsCollection to draw small Ellipse objects to the screen as you drag the mouse on the emulator or finger on a device across the screen. Figure 2 shows the UI in action.
Finger painting without multiple colors is boring. Let's add a ListBox and populate it with the built-in System.Windows.Media.Colors
collection so that the user can select an item and change the "finger
paint" color. We first create a couple of classes to encapsulate the System.Windows.Media.Colors collection since we cannot data bind directly to it. See Listing 2.
Example 2. The ColorClass Code File
public class ColorClass
{
  public Brush ColorBrush { get; set; }
  public String ColorName { get; set; }
}
|
It contains a Brush to represent the RGB values for the color and a text name for the color. We need a collection of ColorClass objects to bind to. Listing 3 has the simple class that generates a collection of ColorClass objects.
Example 3. The ColorsClass Code File
public class ColorsClass
{
  List<ColorClass> _colors;
  public ColorsClass()
  {
    _colors = new List<ColorClass>();
    _colors.Add(new ColorClass() {
      ColorBrush = new SolidColorBrush(Colors.Blue), ColorName = "Blue" });
    _colors.Add(new ColorClass() {
      ColorBrush = new SolidColorBrush(Colors.Brown), ColorName = "Brown"});
    _colors.Add(new ColorClass() {
      ColorBrush = new SolidColorBrush(Colors.Cyan), ColorName = "Cyan"});
    _colors.Add(new ColorClass() {
      ColorBrush = new SolidColorBrush(Colors.DarkGray),
      ColorName = "DarkGray"});
    _colors.Add(new ColorClass() {
      ColorBrush = new SolidColorBrush(Colors.Gray), ColorName = "Gray"});
    _colors.Add(new ColorClass() {
      ColorBrush = new SolidColorBrush(Colors.Green), ColorName = "Green"});
    _colors.Add(new ColorClass() {
      ColorBrush = new SolidColorBrush(Colors.LightGray),
      ColorName = "LightGray" });
    _colors.Add(new ColorClass() {
      ColorBrush = new SolidColorBrush(Colors.Magenta),
      ColorName = "Magenta" });
    _colors.Add(new ColorClass() {
      ColorBrush = new SolidColorBrush(Colors.Orange), ColorName="Orange"});
    _colors.Add(new ColorClass() {
      ColorBrush = new SolidColorBrush(Colors.Purple), ColorName="Purple"});
    _colors.Add(new ColorClass() {
      ColorBrush = new SolidColorBrush(Colors.Red), ColorName = "Red"});
    _colors.Add(new ColorClass() {
      ColorBrush = new SolidColorBrush(Colors.White), ColorName = "White"});
    _colors.Add(new ColorClass() {
      ColorBrush = new SolidColorBrush(Colors.Yellow), ColorName = "Yellow"});
    _colors.Add(new ColorClass() {
ColorBrush = new SolidColorBrush(Colors.Black), ColorName = "Black"});
  }

  public List<ColorClass> ColorsCollection
  {
    get { return _colors; }
  }
}
|
All of the work is done in the constructor using abbreviated syntax to create the collection. Data bind the ColorListBox.ItemsSource to the ColorsClass.ColorsCollection either manually in Visual Studio or with Expression Blend.By default the ColorListBox scrolls vertically. To have the ColorListBox scroll horizontally, right-click on the ColorListBox in Expression Blend and select Edit Additional Templates => Edit Layout of Items (ItemsPanel), Edit a Copy...to edit the template. Drop a StackPanel on to the root ItemsPanelTemplate object. Configure the StackPanel to have Orientation set to Horizontal and that's it: the ColorListBox will scroll horizontally. The last bit of customization is to create an ItemTemplate for ColorListBox. ColorListBox.ItemsSource data binds to the collection. The ItemTemplate has that as its context, so the ItemTemplate data binds to individual records. The following is the ItemTemplate:
<DataTemplate x:Key="FingerPaintingColorTemplate">
  <StackPanel Orientation="Vertical">
    <Rectangle Fill="{Binding ColorBrush}" HorizontalAlignment="Left"
      Height="95" Stroke="Black" VerticalAlignment="Top" Width="95" Margin="4,4,4,0"/>
    <TextBlock HorizontalAlignment="Center" TextWrapping="Wrap"
      Text="{Binding ColorName}" VerticalAlignment="Center" Margin="0"/>
  </StackPanel>
</DataTemplate>
The ColorListBoxDataTemplate consists of a Rectangle that displays the color based on the ColorClass.ColorBrush property and a TextBlock that displays the name of the color based on the ColorClass.ColorName property. Figure 3 shows the resulting work.
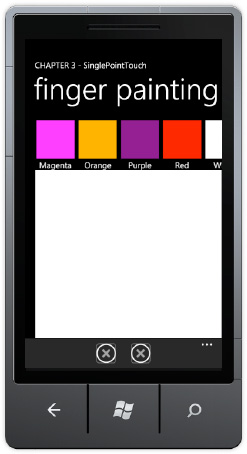
In PhoneApplicationPage_Loaded, set the SelectedIndex on ColorListBox so that a color is always selected. The drawing code is updated to obtain the ColorListBox.SelectedItem object in order to set the brush color for the Ellipse.
private void Rectangle_MouseMove(object sender, MouseEventArgs e)
{
  foreach (StylusPoint p in e.StylusDevice.GetStylusPoints(DrawCanvas))
  {
    Ellipse ellipse = new Ellipse();
    ellipse.SetValue(Canvas.LeftProperty, p.X);
    ellipse.SetValue(Canvas.TopProperty, p.Y);
    ellipse.Opacity = p.PressureFactor;
    ellipse.Width = 20d;
    ellipse.Height = 20d;
    ellipse.IsHitTestVisible = false;
    ellipse.Stroke = ((ColorClass)ColorListBox.SelectedItem).ColorBrush;
    ellipse.Fill = ((ColorClass)ColorListBox.SelectedItem).ColorBrush;
    DrawCanvas.Children.Add(ellipse);
  }
}
The application will now allow finger painting using the selected color in the ColorListBox. In the next section we will expand the painting functionality in the application.
2.2. Expand Painting Functionality
Let's now add
additional painting functionality to make the application more usable,
such as to clear the drawing surface, increase the touch pencil size,
decrease the touch pencil size, show/hide the color palate to change
drawing color, and to set the background for the image. Here is how the
UI is set up:
Clear: Erase the drawing surface (trashcan icon).
Touch color: Shows the color palate to set the drawing color (edit pencil icon).
Pencil size: Increases pencil size (plus sign icon).
Pencil size: Decreases pencil size (minus sign icon).
Set background color menu item: Shows the color palate to set the background color.
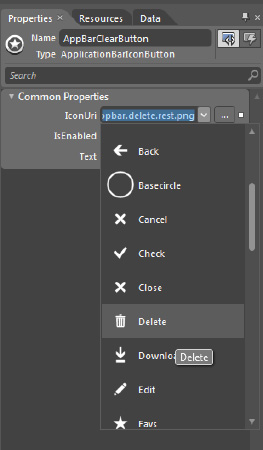
In Expression Blend,
edit the Application Bar to provide four application bar icons and one
menu item. Expression Blend provides access to the built-in icons, as
shown in Figure 4.
Once the application bar icons and menu item are configured visually in Blend, set the ColorListBox control's Visibility to Visibility.Collapsed
so that it is only visible when needed. We switch over to Visual Studio
to add the event handlers in XAML for the Application Bar button icons
and menu item. Listings 4 and 5 have the full source code of the mini-application.
Example 4. The FingerPaintingPageMouseEvents.xaml Code File
<phone:PhoneApplicationPage
  xmlns="http://schemas.microsoft.com/winfx/2006/xaml/presentation"
  xmlns:x="http://schemas.microsoft.com/winfx/2006/xaml"
  xmlns:phone="clr-namespace:Microsoft.Phone.Controls;assembly=Microsoft.Phone"
  xmlns:shell="clr-namespace:Microsoft.Phone.Shell;assembly=Microsoft.Phone"
  xmlns:d="http://schemas.microsoft.com/expression/blend/2008"
  xmlns:mc="http://schemas.openxmlformats.org/markup-compatibility/2006"
  xmlns:SinglePointTouch="clr-namespace:SinglePointTouch"
  x:Class="SinglePointTouch.Pages.FingerPaintingPageMouseEvents"
  SupportedOrientations="Portrait" Orientation="Portrait"
  mc:Ignorable="d" d:DesignHeight="696" d:DesignWidth="480"
  shell:SystemTray.IsVisible="True" Loaded="PhoneApplicationPage_Loaded">
  <phone:PhoneApplicationPage.Resources>
    <SinglePointTouch:ColorsClass x:Key="ColorsClassDataSource"
     d:IsDataSource="True"/>
    <DataTemplate x:Key="FingerPaintingColorTemplate">
      <StackPanel Orientation="Vertical">
        <Rectangle Fill="{Binding ColorBrush}" HorizontalAlignment="Left"
          Height="95" Stroke="Black" VerticalAlignment="Top" Width="95"
          Margin="4,4,4,0"/>
        <TextBlock HorizontalAlignment="Center" TextWrapping="Wrap"
          Text="{Binding ColorName}" VerticalAlignment="Center" Margin="0"/>
      </StackPanel>
    </DataTemplate>
    <ItemsPanelTemplate x:Key="FingerPaintingColorsListBoxItemsPanel">
      <StackPanel Orientation="Horizontal"/>
    </ItemsPanelTemplate>
  </phone:PhoneApplicationPage.Resources>

  <phone:PhoneApplicationPage.ApplicationBar>
    <shell:ApplicationBar IsVisible="True" IsMenuEnabled="True">
      <shell:ApplicationBarIconButton x:Name="AppBarClearButton"
       IconUri="/icons/appbar.delete.rest.jpg" Text="clear"
       Click="AppBarClearButton_Click" />
      <shell:ApplicationBarIconButton x:Name="AppBarChangeTouchColorButton"
       IconUri="/icons/appbar.edit.rest.jpg" Text="touch color"
       Click="AppBarChangeTouchColor_Click"/>
      <shell:ApplicationBarIconButton x:Name="AppBarIncreaseButton"
       IconUri="/icons/appbar.add.rest.jpg" Text="pencil size"
       Click="AppBarIncreaseButton_Click"/>
      <shell:ApplicationBarIconButton x:Name="AppBarDecreaseButton"
       IconUri="/icons/appbar.minus.rest.jpg" Text="pencil size"
       Click="AppBarDecreaseButton_Click"/>
      <shell:ApplicationBar.MenuItems>
        <shell:ApplicationBarMenuItem  Text="Set Background Color"
          x:Name="SetBackgroundColorMenuItem"
          Click="SetBackgroundColorMenuItem_Click" />
      </shell:ApplicationBar.MenuItems>
    </shell:ApplicationBar>
    </phone:PhoneApplicationPage.ApplicationBar>

  <phone:PhoneApplicationPage.FontFamily>
<StaticResource ResourceKey="PhoneFontFamilyNormal"/>
  </phone:PhoneApplicationPage.FontFamily>
  <phone:PhoneApplicationPage.FontSize>
    <StaticResource ResourceKey="PhoneFontSizeNormal"/>
  </phone:PhoneApplicationPage.FontSize>
  <phone:PhoneApplicationPage.Foreground>
    <StaticResource ResourceKey="PhoneForegroundBrush"/>
  </phone:PhoneApplicationPage.Foreground>
  <Grid x:Name="LayoutRoot" Background="Transparent" DataContext=
        "{Binding Source={StaticResource ColorsClassDataSource}}" >
    <Grid.RowDefinitions>
      <RowDefinition Height="Auto"/>
      <RowDefinition Height="*"/>
    </Grid.RowDefinitions>

    <!--TitlePanel contains the name of the application and page title-->
    <StackPanel x:Name="TitlePanel" Grid.Row="0" Margin="12,17,0,28">
      <TextBlock x:Name="ApplicationTitle" Text="Chapter 3 - SinglePointTouch"
                 Style="{StaticResource PhoneTextNormalStyle}"/>
      <TextBlock x:Name="PageTitle" Text="finger painting" Margin="9,-7,0,0"
                 Style="{StaticResource PhoneTextTitle1Style}"/>
    </StackPanel>

    <!--ContentPanel - place additional content here-->
    <Grid x:Name="ContentPanel" Grid.Row="1" Margin="24,0,0,0">
      <Canvas x:Name="DrawCanvas"  >
                <Rectangle Fill="White"  Stroke="Black" Name="BlankRectangle"
                        MouseMove="Rectangle_MouseMove" Width="456" Height="535"  />
        </Canvas>
      <ListBox x:Name="ColorListBox" Margin="0"
        ScrollViewer.HorizontalScrollBarVisibility="Auto"
        ScrollViewer.VerticalScrollBarVisibility="Disabled"
        ItemsPanel="{StaticResource FingerPaintingColorsListBoxItemsPanel}"
        VerticalAlignment="Top" ItemsSource="{Binding ColorsCollection}"
        ItemTemplate="{StaticResource FingerPaintingColorTemplate}"
        Background="Black" SelectedIndex="-1" HorizontalAlignment="Right"
        Width="456" RenderTransformOrigin="0.5,0.5"
        SelectionChanged="ColorListBox_SelectionChanged" Visibility="Collapsed">
      </ListBox>
    </Grid>
  </Grid>
</phone:PhoneApplicationPage>
|
Example 5. The FingerPaintingPageMouseEvents.xaml.cs Code File
using System;
using System.Windows;
using System.Windows.Controls;
using System.Windows.Input;
using System.Windows.Media;
using System.Windows.Shapes;
using System.Windows.Threading;
using Microsoft.Phone.Controls;
namespace SinglePointTouch.Pages
{
  public partial class FingerPaintingPageMouseEvents : PhoneApplicationPage
  {
    private Rectangle _backgroundRectangle;
    private double _touchRadius = 20d;
    private bool ColorBackgroundMode = false;
    private int TouchPaintingSelectedColorIndex;

    public FingerPaintingPageMouseEvents()
    {
      InitializeComponent();

      _backgroundRectangle = BlankRectangle;
    }

    private void Rectangle_MouseMove(object sender, MouseEventArgs e)
    {
      foreach (StylusPoint p in e.StylusDevice.GetStylusPoints(DrawCanvas))
      {
        Ellipse ellipse = new Ellipse();
        ellipse.SetValue(Canvas.LeftProperty, p.X);
        ellipse.SetValue(Canvas.TopProperty, p.Y);
        ellipse.Opacity = p.PressureFactor;
        ellipse.Width = _touchRadius;
        ellipse.Height = _touchRadius;
        ellipse.IsHitTestVisible = false;
        ellipse.Stroke = ((ColorClass)ColorListBox.SelectedItem).ColorBrush;
        ellipse.Fill = ((ColorClass)ColorListBox.SelectedItem).ColorBrush;
        DrawCanvas.Children.Add(ellipse);
      }
    }

    private void PhoneApplicationPage_Loaded(object sender, RoutedEventArgs e)
    {
      ColorListBox.SelectedIndex = 0;

      //Setup memory tracking timer
      DispatcherTimer DebugMemoryTimer = new DispatcherTimer();
      DebugMemoryTimer.Interval = new TimeSpan(0, 0, 0, 0, 5000);
      DebugMemoryTimer.Tick += DebugMemoryInfo_Tick;
      DebugMemoryTimer.Start();
    }

    // Track memory Info
    void DebugMemoryInfo_Tick(object sender, EventArgs e)
    {
      //GC.GetTotalMemory(true);
      long deviceTotalMemory =
       (long)Microsoft.Phone.Info.DeviceExtendedProperties.GetValue(
       "DeviceTotalMemory");
      long applicationCurrentMemoryUsage =
       (long)Microsoft.Phone.Info.DeviceExtendedProperties.GetValue(
       "ApplicationCurrentMemoryUsage");
      long applicationPeakMemoryUsage =
(long)Microsoft.Phone.Info.DeviceExtendedProperties.GetValue(
       "ApplicationPeakMemoryUsage");

      System.Diagnostics.Debug.WriteLine("--> " +
        DateTime.Now.ToLongTimeString());
      System.Diagnostics.Debug.WriteLine("--> Device Total : " +
        deviceTotalMemory.ToString());
      System.Diagnostics.Debug.WriteLine("--> App Current : " +
        applicationCurrentMemoryUsage.ToString());
      System.Diagnostics.Debug.WriteLine("--> App Peak : " +
        applicationPeakMemoryUsage.ToString());
    }

    private void AppBarClearButton_Click(object sender, EventArgs e)
    {
      DrawCanvas.Children.Clear();
      DrawCanvas.Children.Add(BlankRectangle);
      BlankRectangle.Fill = new SolidColorBrush(Colors.White);
    }

    private void AppBarIncreaseButton_Click(object sender, EventArgs e)
    {
      if (_touchRadius <= 30d)
      {
        _touchRadius += 5;
      }
    }

    private void AppBarDecreaseButton_Click(object sender, EventArgs e)
    {
      if (_touchRadius > 20d)
      {
        _touchRadius -= 5;
      }
    }

    private void SetBackgroundColorMenuItem_Click(object sender, EventArgs e)
    {
      ColorListBox.Visibility = Visibility.Visible;
      ColorBackgroundMode = true;
      TouchPaintingSelectedColorIndex = ColorListBox.SelectedIndex;
    }

    private void ColorListBox_SelectionChanged(object sender,
      SelectionChangedEventArgs e)
    {
      ColorListBox.Visibility = Visibility.Collapsed;
      if (ColorBackgroundMode == true)
      {
        _backgroundRectangle.Fill =
          ((ColorClass)ColorListBox.SelectedItem).ColorBrush;
        ColorBackgroundMode = false;
        ColorListBox.SelectedIndex = TouchPaintingSelectedColorIndex;
}
    }

    private void AppBarChangeTouchColor_Click(object sender, EventArgs e)
    {
      ColorListBox.Visibility = Visibility.Visible;
    }
  }
}
|
In Listing 5 there is memory-tracking code to help analyze memory consumption that I cover in the next section.
2.3. Analyzing Memory
In Listing 5 there is an event handler named DebugMemoryInfo_Tick, as well as code in the PhoneApplicationPage_Loaded method to fire the Tick event for a DispatcherTimer object named TrackMemoryTimer. The DebugMemoryInfo_Tick event handler generates this text to the Output window in Visual Studio when the finger painting page is launched in the SinglePointTouch project.
--> 7:14:50 PM
--> Device Total : 497618944
--> App Current : 11014144
--> App Peak : 12492800
Next, draw a sample image, such as that shown in Figure 5.
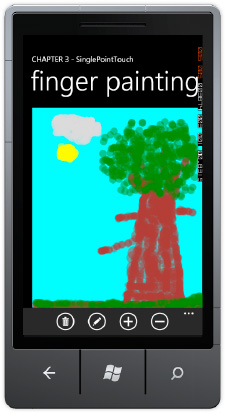
What follows is the resulting memory consumption:
--> 7:14:36 AM
--> Device Total : 390012928
--> App Current : 24748032
--> App Peak : 24748032
The emulator has essentially
unlimited memory so consuming almost 250MB of RAM runs fine. You could
finger paint a similar image on a physical device with 512MB, and it
would be fine as well. However, for certification in AppHub,
applications need to stay under 90MB to pass. This is because on a
device with 256MB of RAM, consuming more than that could impact
performance.
Tracking memory using
this script or something similar is a very important aspect of
performance tuning WP7 applications, especially when testing on the
emulator that essentially has unlimited resources.
|
Applications can momentarily go
over 90MB and not crash, so don't panic if your application peaks over
90MB, but settles in below 90MB.
|
|
The reason the
finger painting application consumes memory is that it is a purely
vector-based drawing consisting of Ellipse objects. The Ellipse objects
can yield an impressionistic effect with careful drawing but it does
result in high memory consumption. As a user moves the mouse, new
Ellipse objects are drawn to screen. When drawing over an area that is
already colored, the old color is still present underneath in Ellipse
objects. Options to investigate are to use Silverlight geometry
primitives instead of Ellipse objects. Another option to reduce memory
consumption is to use the WritableBitmap class to "burn" the objects
into the background as a way to collapse the vector objects into simple
raster bitmaps.
The Mouse and Touch
events are familiar to developers and easy to work with; however, they
should only be used when absolutely necessary, such as when you need
individual touch points. The MSDN documentation has a section titled
"Performance Considerations in Applications for Windows Phone" available
here
http://msdn.microsoft.com/en-us/library/ff967560(v=VS.92).aspx
This white paper has a
section titled "User Input" that recommends using Manipulation Events
instead of mouse and touch events or performance and compatibility
reasons for all scenarios other than when you need individual points.